
Posted on May 13, 2005
Sanding and painting
Sanding was the worst part of it all. I had used plastic steel for filling all the joints, so that they were nice and smooth, but this caused a lot of dust. After 4-5 hours it was like I had gotten a bag of flour in my hair. I never was completely satisfied with my sanding/polishing work, but I was tired and had dust everywhere...
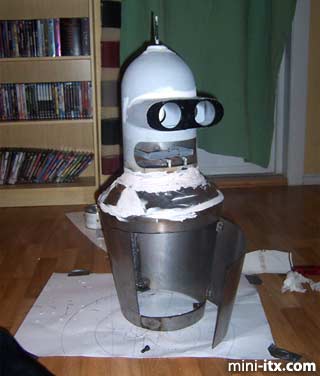
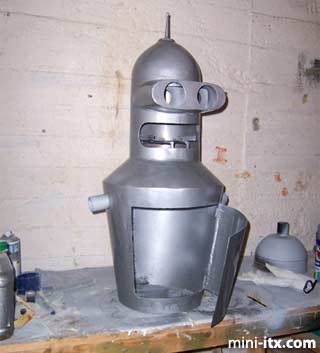
The painting went very well and very quickly.
Next there were the hands and legs. The hands themselves were made from 2 flower pots. The fingers were made from 6 aluminium tubes.
The fingers were attached with plastic steel and were sanded and painted.
Mounting Benders parts
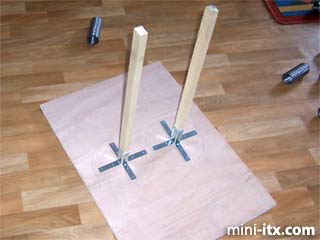
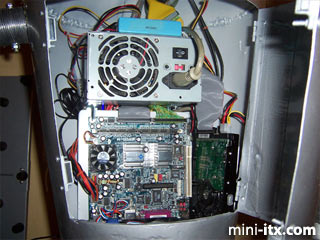
Then we had to attach the arms, legs and hardware. After a lot of cutting of overlong arms and legs, I got a nice, fitting length. But there was one problem. Despite the legs being shorter than planned, he was very unsteady. Therefore I made a stand for him. I attached 2 pieces of wood to 8 x 90 degree angle braces to form a pair of cross braces. I then threaded the legs onto the pieces of wood and Bender became very steady. You can even push him without him falling over.
After the platform was made, everything went like a dream. The parts slotted right inside. I can thank myself for this due to careful planning and taking my time with the project. It actually took 3 months longer than planned.
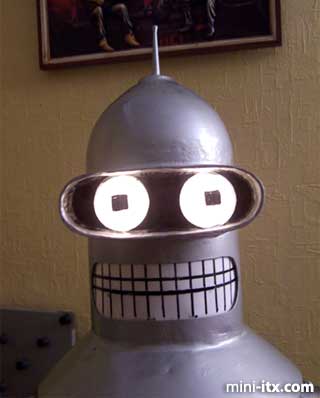
Finished result
After everything was in place, it was finally time for Bender to pose for the cameras.
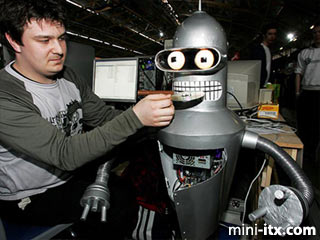
One button is for power, the other is Bender's voice button.
It says: "Bite My Shiny Metal Ass"...
Why not visit Jan's original Bender page, sign his guestbook
and check out his video of the CD in action?
 |
 |
 |
Quick Links
Mailing Lists:
Mini-ITX Store
Projects:
Show Random
Accordion-ITX
Aircraft Carrier
Ambulator 1
AMD Case
Ammo Box
Ammo Tux
AmmoLAN
amPC
Animal SNES
Atari 800 ITX
Attache Server
Aunt Hagar's Mini-ITX
Bantam PC
BBC ITX B
Bender PC
Biscuit Tin PC
Blue Plate
BlueBox
BMW PC
Borg Appliance
Briefcase PC
Bubbacomp
C1541 Disk Drive
C64 @ 933MHz
CardboardCube
CAUV 2008
CBM ITX-64
Coelacanth-PC
Cool Cube
Deco Box
Devilcat
DOS Head Unit
Dreamcast PC
E.T.PC
Eden VAX
EdenStation IPX
Encyclomedia
Falcon-ITX
Florian
Frame
FS-RouterSwitch
G4 Cube PC
GasCan PC
Gingerbread
Gramaphone-ITX-HD
GTA-PC
Guitar PC
Guitar Workstation
Gumball PC
Hirschmann
HTPC
HTPC2
Humidor 64
Humidor CL
Humidor II
Humidor M
Humidor PC
Humidor V
I.C.E. Unit
i64XBOX
i-EPIA
iGrill
ITX Helmet
ITX TV
ITX-Laptop
Jeannie
Jukebox ITX
KiSA 444
K'nex ITX
Leela PC
Lego 0933 PC
Legobox
Log Cabin PC
Lunchbox PC
Mac-ITX
Manga Doll
Mantle Radio
Mediabox
Mega-ITX
Micro TV
Mini Falcon
Mini Mesh Box
Mini-Cluster
Mobile-BlackBox
Moo Cow Moo
Mr OMNI
NAS4Free
NESPC
OpenELEC
Osh Kosh
Pet ITX
Pictureframe PC
Playstation 2 PC
Playstation PC
Project NFF
PSU PC
Quiet Cubid
R2D2PC
Racing The Light
RadioSphere
Restomod TV
Robotica 2003
Rundfunker
SaturnPC
S-CUBE
SEGA-ITX
SpaceCase
SpacePanel
Spartan Bluebird
Spider Case
Supra-Server
Teddybear
Telefunken 2003
TERA-ITX
The Clock
ToAsTOr
Tortoise Beetle
Tux Server
Underwood No.5
Waffle Iron PC
Windows XP Box
Wraith SE/30
XBMC-ION