
Posted on June 4, 2003
|
Introduction
Can you fit a: 933Mhz Pentium, 256MB DDR Ram, DVD ROM, 10GB HDD, 145W PSU, 64MB AGP TNT2 (equivalent), 5.1 DD DTS out, USB 2.0 and 1394 all into a 10.25" length x 8.75" wide x 4.25" depth box? I did.
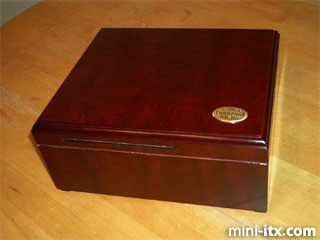
This brings us to my latest mod: The Humidor PC.
I want to start off by thanking Jeffrey L. Stephenson for the idea. To my knowledge, this is his original idea. I just wanted one of my own. I would like to thank Peter Frank (my brother in law) for his help with the preparation and construction. (I have very limited carpentry skills!). Also I would like to say that the interior is by no means as intricate as Jeff's humidor projects. My humidor was designed to be enclosed within a home theater and has a finished exterior design.
Now let's get down to business.
The Humidor PC
The Humidor PC is a home theater PC. This will be pumping into a ½ T-1, S-Video to a flat I-Art JVC TV then 5.1 DTS to the sound system. All this is controlled via a wireless mouse and keyboard. I chose the VIA M9000 main board. This board runs at 933Mhz, 266 FSB, full DDR support and video is shared 64MB RAM - broadly equivalent to a TNT2 Ultra (speed wise). The board also supports S/PDIF for "coax optical" and S-Video, I will be using both. These features enable us to watch ANY format of media. Therefore, I am not limited to the boundaries of the "standard DVD player".
The HDD is a 10GB Fujitsu notebook drive,
along with an IDE converter. The DVD is a slim-slot-load drive
that came from an IMac notebook, again using an IDE 50 to
40 pin converter. Power is derived from a 145W E-Machine PSU.
The nice thing about the VIA is it only requires 60W of power
for the integrated C3 Pentium
• Humidor: $25.00, 10.25" x 8.75"
x 4.25" (L x W x D)
• 145W ATX mini PSU: Free, traded somebody for a 250W
standard size
• Notebook 10GB HDD & IDE adaptor
• Slimline slotload DVD drive & IDE adaptor
• 256MB Crucial PC2100 DDR
• Windows XP Pro
• VIA EPIA-M9000 933Mhz
• Chieftec wireless keyboard/mouse in silver
• Four 40mm fans, one 50mm
Preparation:
|

I arranged the parts on an ESD smock to reduce static.
When I received the main board, I first removed the sinks from the processor and the north bridge. Once detached, I removed the cheap "conductive pad" and replaced it with Artic Silver III. I also included Artic Silver III on the south bridge. Once the grease was situated, I replaced the sinks adding one to the south bridge as well. Being the hottest chip, I do not understand why VIA did not include a sink standard on the south bridge. Four drops of super glue on each of the chip's corners and it's stuck down tight.
Once the board was geared up, I was ready to begin the Windows XP install. Because this PC will be an "almost always ON" unit, I formatted in NTFS. Since this is not a gaming machine - I did not go with FAT. I would have used Linux, but ultimately decided against it.
I installed the latest VIA 4-in-1 drivers, NV DVD, Divix, and Nimo codec pack. I also included WINAMP light for radio, WMP9, and Quick Time. Diskeeper, Zone Alarm and Ad-Aware 6 were incorporated as well. The RealTek drives allow me to run both S/PDIF digital 5.1 and analog through the same cable simultaneously.
Planning and fitting:
|
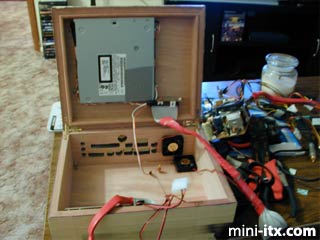
We constructed custom brackets for the
DVD drive. They were formed from scrap PC rails. I wanted
an "ON" indicator so I included bright red LED's
on the DVD drive, which also deliver a custom look. The back
of the slim DVD drive- next to the 40pin connector, there
is a little fold in the metal case that prevented me from
attaching the IDE adapter smoothly. I had to bend that out
of the way. Once the adapter was flush, I attached a small
piece of electrical tape then a large piece of duct tape so
the adapter would be secure. I wasn't sure if duct tape was
conductive or not thus is why I used electrical tape in the
middle.
The HDD is attached on the inside/front with double-sided tape.
|
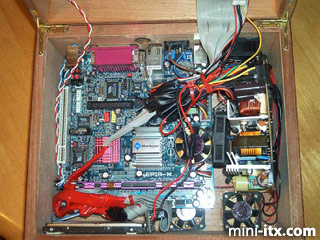
The PSU was small to begin with, but I wanted it even smaller. So, took it out of the metal chassis (I do NOT recommend taking apart a PSU - we could all die!). This reduced the overall size of the power supply to approximately half of its original size, although it is not as distinct. I shortened every main board power connector, twenty total. I have a solder gun, but have no real solder skill and patience, so electrical tape was used (I know, I know maybe later). There is no molex connector in this box at all. I just hard wired everything to safe space.
 |
 |
 |
Quick Links
Mailing Lists:
Mini-ITX Store
Projects:
Show Random
Accordion-ITX
Aircraft Carrier
Ambulator 1
AMD Case
Ammo Box
Ammo Tux
AmmoLAN
amPC
Animal SNES
Atari 800 ITX
Attache Server
Aunt Hagar's Mini-ITX
Bantam PC
BBC ITX B
Bender PC
Biscuit Tin PC
Blue Plate
BlueBox
BMW PC
Borg Appliance
Briefcase PC
Bubbacomp
C1541 Disk Drive
C64 @ 933MHz
CardboardCube
CAUV 2008
CBM ITX-64
Coelacanth-PC
Cool Cube
Deco Box
Devilcat
DOS Head Unit
Dreamcast PC
E.T.PC
Eden VAX
EdenStation IPX
Encyclomedia
Falcon-ITX
Florian
Frame
FS-RouterSwitch
G4 Cube PC
GasCan PC
Gingerbread
Gramaphone-ITX-HD
GTA-PC
Guitar PC
Guitar Workstation
Gumball PC
Hirschmann
HTPC
HTPC2
Humidor 64
Humidor CL
Humidor II
Humidor M
Humidor PC
Humidor V
I.C.E. Unit
i64XBOX
i-EPIA
iGrill
ITX Helmet
ITX TV
ITX-Laptop
Jeannie
Jukebox ITX
KiSA 444
K'nex ITX
Leela PC
Lego 0933 PC
Legobox
Log Cabin PC
Lunchbox PC
Mac-ITX
Manga Doll
Mantle Radio
Mediabox
Mega-ITX
Micro TV
Mini Falcon
Mini Mesh Box
Mini-Cluster
Mobile-BlackBox
Moo Cow Moo
Mr OMNI
NAS4Free
NESPC
OpenELEC
Osh Kosh
Pet ITX
Pictureframe PC
Playstation 2 PC
Playstation PC
Project NFF
PSU PC
Quiet Cubid
R2D2PC
Racing The Light
RadioSphere
Restomod TV
Robotica 2003
Rundfunker
SaturnPC
S-CUBE
SEGA-ITX
SpaceCase
SpacePanel
Spartan Bluebird
Spider Case
Supra-Server
Teddybear
Telefunken 2003
TERA-ITX
The Clock
ToAsTOr
Tortoise Beetle
Tux Server
Underwood No.5
Waffle Iron PC
Windows XP Box
Wraith SE/30
XBMC-ION