
Posted on January 19, 2004
Introduction
|
My seven year old 200 MHz Pentium class PC was showing its age last year. The mini-ITX boards were perfect for a new computer, well suited for running 24x7 due to relatively low power requirements. They also had ample I/O ports, both USB and Firewire as well as serial and parallel ports. Linux support was still partial then but sufficient for my uses. As it has turned out, most of the hardware devices on the M class EPIA boards have at least alpha or beta quality driver support now under Linux. It is a pleasant surprise to see how well Linux is able to handle decoding video streams (compared to a few years ago when it was crippled). I am running a 2.4.22 kernel with glibc 2.3.2 (patched to avoid cmov bug in glibc), gcc 3.3.2, XFree 4.3.99.902 and MPlayer 1.0pre2.
The real reason I elected to use a mini-ITX mainboard was its very small size. It was just cool and offered more possibilities for case design. I wanted to build something unique that could fit in a bookshelf. I'm happy with the result although the project has evolved over time. There were never any fixed plans so the computer didn't turn out how I originally envisioned it. A coworker referred to it as the "Borg Appliance" which seemed most appropriate given the organic nature of Borg technology.
Construction
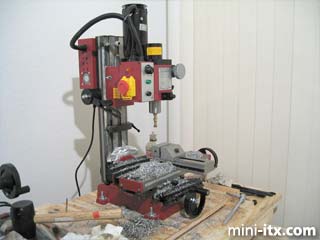
A year ago, I set up a small machine shop in my 600 square foot apartment bedroom to remedy a foolish mistake when over tightening a machine screw. I didn't want to pay a machinist or smith to do the job so decided to set up my own shop which would be useful for many things. I had no experience with machine tools or metalwork. I also didn't have a workbench or table so had to make that first. Below you can see the milling machine on the worktable with some of the aluminum chip aftermath from this project. Fabrication went on for months in spare time after work. To give an idea of how much time it takes, the recessed holes for the USB and Firewire ports in the front aluminum panel took nine hours to mill. All of the polycarbonate panels were cut, drilled, tapped, and fitted, with hand tools in about 100 hours. It would have been a lot easier and faster if the mill were larger and I had proper power tools for cutting plastic.
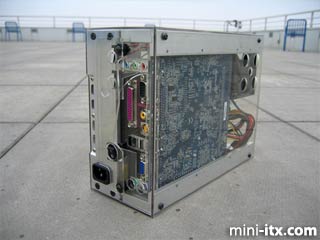
The Borg Appliance has a frame of milled 6061-T6 aluminum stock held together with alloy socket head machine screws. The case panels are .093 Lexan (polycarbonate). There are a lot of close fitting parts, particularly the tongue and groove joints between the columns and rails that together with the front and rear panels form the frame of the case. I learned a lot about milling aluminum and working polycarbonate from this project.
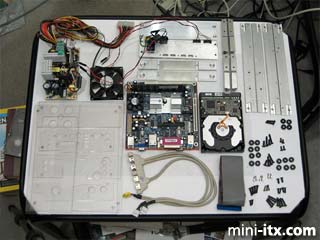
All of the electronics came from a local store in Dallas: a VIA M9000 mainboard, 512 MB DDR, 180 Watt power supply, 180 GB hard disk, two snap switches and wire. The aluminum stock and most of the machine screws came via mail order from ENCO, an industrial supply company. The metric screws for mounting the USB/Firewire header plugs came from Elliot's Hardware. The polycarbonate sheet and rubber washers (used for faucets) came from a Home Depot down the street.
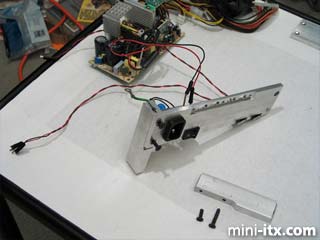
Assembly is somewhat involved, more like working on an automobile in that you have to put things together in the correct order. The front and rear aluminum panels are screwed into the thick columns with countersunk 8x32 screws. The power plug is a snug fit in the front panel. The hole for the plug was roughed out with a quarter inch end mill and then fitting done by hand with a mill file. The snap switches (upper one is power, below that is reset) are epoxied in place.
|
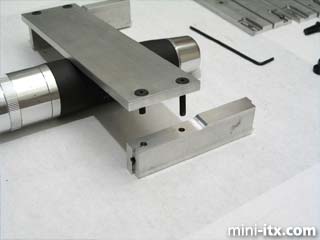
At first, the hard disk mounting rails were plain quarter inch thick aluminum rectangles. Unfortunately, to get the master power switch on the front panel to fit in place, the hard disk had to move another one eighth inch outwards. So I had to mill out a recess in the rails. The finish looks different in the recess as I used a mill file to do the final fitting by hand.
 |
 |
 |
Quick Links
Mailing Lists:
Mini-ITX Store
Projects:
Show Random
Accordion-ITX
Aircraft Carrier
Ambulator 1
AMD Case
Ammo Box
Ammo Tux
AmmoLAN
amPC
Animal SNES
Atari 800 ITX
Attache Server
Aunt Hagar's Mini-ITX
Bantam PC
BBC ITX B
Bender PC
Biscuit Tin PC
Blue Plate
BlueBox
BMW PC
Borg Appliance
Briefcase PC
Bubbacomp
C1541 Disk Drive
C64 @ 933MHz
CardboardCube
CAUV 2008
CBM ITX-64
Coelacanth-PC
Cool Cube
Deco Box
Devilcat
DOS Head Unit
Dreamcast PC
E.T.PC
Eden VAX
EdenStation IPX
Encyclomedia
Falcon-ITX
Florian
Frame
FS-RouterSwitch
G4 Cube PC
GasCan PC
Gingerbread
Gramaphone-ITX-HD
GTA-PC
Guitar PC
Guitar Workstation
Gumball PC
Hirschmann
HTPC
HTPC2
Humidor 64
Humidor CL
Humidor II
Humidor M
Humidor PC
Humidor V
I.C.E. Unit
i64XBOX
i-EPIA
iGrill
ITX Helmet
ITX TV
ITX-Laptop
Jeannie
Jukebox ITX
KiSA 444
K'nex ITX
Leela PC
Lego 0933 PC
Legobox
Log Cabin PC
Lunchbox PC
Mac-ITX
Manga Doll
Mantle Radio
Mediabox
Mega-ITX
Micro TV
Mini Falcon
Mini Mesh Box
Mini-Cluster
Mobile-BlackBox
Moo Cow Moo
Mr OMNI
NAS4Free
NESPC
OpenELEC
Osh Kosh
Pet ITX
Pictureframe PC
Playstation 2 PC
Playstation PC
Project NFF
PSU PC
Quiet Cubid
R2D2PC
Racing The Light
RadioSphere
Restomod TV
Robotica 2003
Rundfunker
SaturnPC
S-CUBE
SEGA-ITX
SpaceCase
SpacePanel
Spartan Bluebird
Spider Case
Supra-Server
Teddybear
Telefunken 2003
TERA-ITX
The Clock
ToAsTOr
Tortoise Beetle
Tux Server
Underwood No.5
Waffle Iron PC
Windows XP Box
Wraith SE/30
XBMC-ION