
Posted on July 18, 2005
Introduction
I have been working with computers for a long time now, but it was not until I moved home from University in December 2002 that I realised how noisy they had become. I now have a PC in my bedroom that kicks out a lot of noise, even using silent components. In addition to this, I have been looking at the Mini-ITX modifications and projects for a long time, and patiently waiting for the Nano-ITX to be realised. By Summer 2004 I finally got bored of waiting and having all that noise I just could not bear any longer, so I finally decided to do something about it.
What I wanted was a computer that would be silent, in the true meaning of "silent," that I could use to check my emails and produce all of my material for my job (teaching) on. I also wanted this to be cheap, especially if there was a chance I could seriously mess it up. Therefore I went with the VIA EPIA 5000 motherboard, purchased from Mini-ITX.com
Components
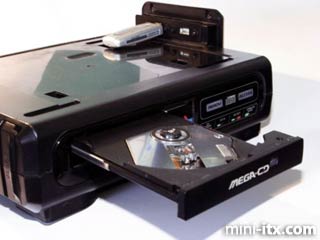
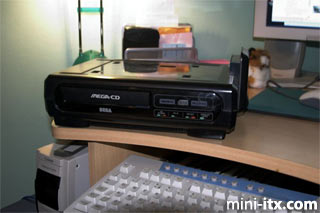
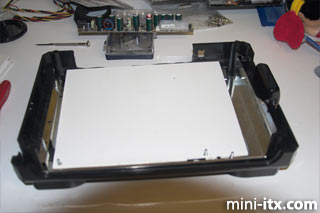
To start with, I wanted a case before purchasing anything else. This is a key point for anyone building a Mini-ITX project. Get the case first, and then plan the rest of the components around the case, something I am only too familiar with now. Anyway, I wanted something small, unobtrusive and would not look out of place. I finally decided to go "RETRO" and obtained a non working SEGA Mega-CD from EBay for £15 as shown below.
Next, the case was opened-up and gutted as shown in figure 2. Several parts of the casing removed and a part cut out of the back of the case for access to the ports on the motherboard. This then allowed me to measure the space and figure out what components I could fit in to the box.
At this stage I the remaining components. A complete list of parts is given below (just to give you an idea):
• VIA EPIA 5000 Motherboard
• SEGA MEGA-CD
• Slimline DVD-ROM
• 40GB Laptop Hard Disk
• 60W PSU Kit
• Slimline CD Adapter
• 2.5" to 3.5" IDE Adapter Cable
• 256MB Memory (from previous project)
• Netgear 11Mbps Wireless USB
• USB Cable Adapter
Construction
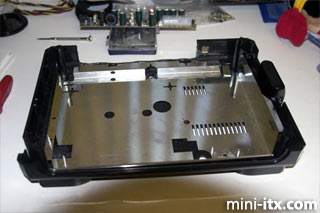
As I said earlier, the case was gutted and several of the plastic parts of the case were removed (see figure 2). I wanted to reduce the noise coming from this system, electrical noise that is, due partly because we have a HAM operator living next door but also to reduce interference with any of my other equipment. This is something that many designs simply ignore or forget about, and is certainly worth considering early on with any design. Hence some of the original metal shielding has been left in place.
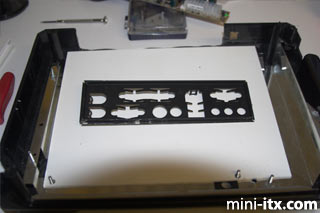
The next step was to open part of the back of the casing up to allow access to the ports on the motherboard. I decided at this point to make a hole large enough to allow the standard metal bracket to be mounted:
Initially I was going to sit the motherboard level. However this then creates a major problem. That is that the RAM sits too high to allow for the DVD-ROM to fit in the case and use the original CD opening. I could have moved the DVD-ROM tray and created another opening, but then what’s the point in modding something like this if you are not going to use the original characteristics? At this point, the only real alternative was to sit the motherboard in at an angle, which presents another minor problem that I will discuss later. Two holes were drilled through the case to allow the motherboard to be secured. To stop any shorting, a sheet of plastic was placed between the metal on the casing and the motherboard. The same problem is presented with the PSU board, and so the same solution was applied.
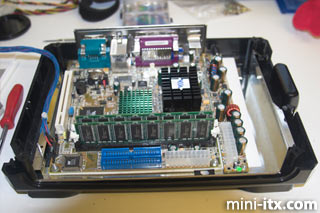
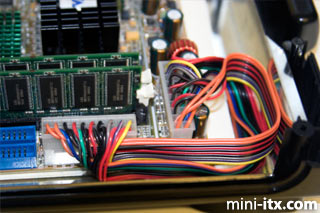
At the start of this project, I thought a motherboard, 17cm x17cm and a case as big as the MEGA-CD would have plenty of room. At this stage it was becoming apparent that I may be wrong. I attached the PSU cable to the motherboard, which instantly showed how tight it was going to get:
 |
 |
 |
Quick Links
Mailing Lists:
Mini-ITX Store
Projects:
Show Random
Accordion-ITX
Aircraft Carrier
Ambulator 1
AMD Case
Ammo Box
Ammo Tux
AmmoLAN
amPC
Animal SNES
Atari 800 ITX
Attache Server
Aunt Hagar's Mini-ITX
Bantam PC
BBC ITX B
Bender PC
Biscuit Tin PC
Blue Plate
BlueBox
BMW PC
Borg Appliance
Briefcase PC
Bubbacomp
C1541 Disk Drive
C64 @ 933MHz
CardboardCube
CAUV 2008
CBM ITX-64
Coelacanth-PC
Cool Cube
Deco Box
Devilcat
DOS Head Unit
Dreamcast PC
E.T.PC
Eden VAX
EdenStation IPX
Encyclomedia
Falcon-ITX
Florian
Frame
FS-RouterSwitch
G4 Cube PC
GasCan PC
Gingerbread
Gramaphone-ITX-HD
GTA-PC
Guitar PC
Guitar Workstation
Gumball PC
Hirschmann
HTPC
HTPC2
Humidor 64
Humidor CL
Humidor II
Humidor M
Humidor PC
Humidor V
I.C.E. Unit
i64XBOX
i-EPIA
iGrill
ITX Helmet
ITX TV
ITX-Laptop
Jeannie
Jukebox ITX
KiSA 444
K'nex ITX
Leela PC
Lego 0933 PC
Legobox
Log Cabin PC
Lunchbox PC
Mac-ITX
Manga Doll
Mantle Radio
Mediabox
Mega-ITX
Micro TV
Mini Falcon
Mini Mesh Box
Mini-Cluster
Mobile-BlackBox
Moo Cow Moo
Mr OMNI
NAS4Free
NESPC
OpenELEC
Osh Kosh
Pet ITX
Pictureframe PC
Playstation 2 PC
Playstation PC
Project NFF
PSU PC
Quiet Cubid
R2D2PC
Racing The Light
RadioSphere
Restomod TV
Robotica 2003
Rundfunker
SaturnPC
S-CUBE
SEGA-ITX
SpaceCase
SpacePanel
Spartan Bluebird
Spider Case
Supra-Server
Teddybear
Telefunken 2003
TERA-ITX
The Clock
ToAsTOr
Tortoise Beetle
Tux Server
Underwood No.5
Waffle Iron PC
Windows XP Box
Wraith SE/30
XBMC-ION