
Posted on January 17, 2005
Introduction
Why would I ever want to do this? Lots of people have asked me this, and I really have no idea why. I may or may not be completely nuts. I guess I've always been interested in making computers more aesthetically pleasing than the dull beige-box. I started off in the usual way, cutting case windows, doing silly things with uv-reactive paint, and generally aiming for a mix of style and substance in my hardware. Hey, if it doesn't go like the clappers, why bother making it look like it should?
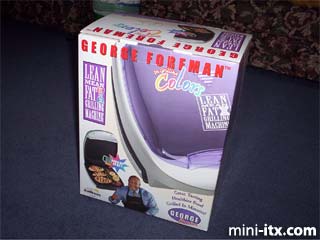
But that wasn't enough, and impressed by some of the work I'd seen on Mini-ITX.com, I was on the lookout for a real custom project to make a machine stand out. I was also, at the time, in the market for a small, quiet/silent server that I could leave in the corner of a room without it looking too obnoxious. It was around this time, I got shown the thinkgeek April fools joke of the George Foreman USB iGrill. Then I got thinking. The Mini-ITX form factor (170x170mm) was almost exactly the same width as a George Foreman "Junior" grill. One visit to amazon later, and I'd ordered the cheapest (£20) case I'd ever had. The rest, as they say, is history. And yes, like thinkgeek stated, it does have USB 2.0 support ;).
Construction
While I'd been musing the technical feasibility of this mod for a few weeks, before the build, I didn't really find out whether I was attempting something possible until the toys started to arrive.
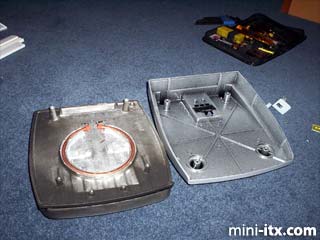
Of course, the first thing to do when a new toy arrives is to completely take it apart. So 5 minutes with philips-head and pro-drive screwdrivers later, it was down to the bare components. With hindsight, I probably should have done this with some kind of due care and attention, as it took me as long again to figure out which bits belonged where. I had intended to use the original power cabling, and mod the psu to use them, but this proved unfeasible, as I had to slice the cabling in two just to open the damn thing up.
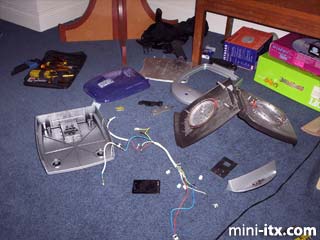
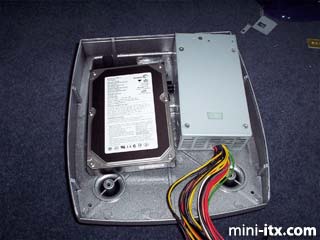
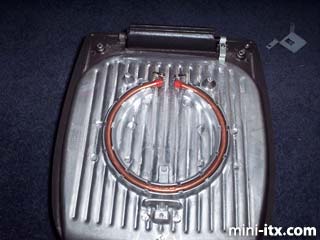
Once everything had been separated, the first crunch moment came. Would the components fit? Thankfully, my envisioned hard-drive/psu area (in the base of the grill) would work, after a little work on the lower grillplate with a dremel. Holes would have to be cut from the plastic base for ventilation, and a chunk from the grill plate was needed to let the PSU pop out over the bottom plate.
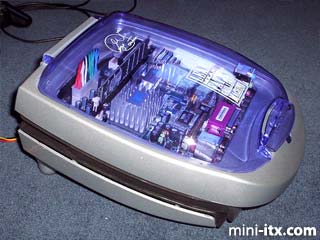
But somewhat wonderfully, the motherboard almost exactly fit in the top section, and would need only minor modifications to the top grill-plate for the final product. The element would have to go, and a small lip at the front needed removing to allow cable placement, but other than that, a promising sign.

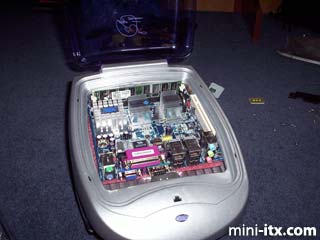
The idea I had for the cabling was to route the IDE and ATX cables through the hinge holding the top and bottom grill plates together. It was wide enough, but would need a bit of work to open up a hole large enough to accomodate those bloody huge ATX plugs.
Next up I decided I probably ought to test that all the components worked together. Thankfully, power supply, RAM, hard drive, and motherboard all played together nicely, and I was able to fiddle about in the BIOS and perform an over-heating test.
 |
 |
 |
Quick Links
Mailing Lists:
Mini-ITX Store
Projects:
Show Random
Accordion-ITX
Aircraft Carrier
Ambulator 1
AMD Case
Ammo Box
Ammo Tux
AmmoLAN
amPC
Animal SNES
Atari 800 ITX
Attache Server
Aunt Hagar's Mini-ITX
Bantam PC
BBC ITX B
Bender PC
Biscuit Tin PC
Blue Plate
BlueBox
BMW PC
Borg Appliance
Briefcase PC
Bubbacomp
C1541 Disk Drive
C64 @ 933MHz
CardboardCube
CAUV 2008
CBM ITX-64
Coelacanth-PC
Cool Cube
Deco Box
Devilcat
DOS Head Unit
Dreamcast PC
E.T.PC
Eden VAX
EdenStation IPX
Encyclomedia
Falcon-ITX
Florian
Frame
FS-RouterSwitch
G4 Cube PC
GasCan PC
Gingerbread
Gramaphone-ITX-HD
GTA-PC
Guitar PC
Guitar Workstation
Gumball PC
Hirschmann
HTPC
HTPC2
Humidor 64
Humidor CL
Humidor II
Humidor M
Humidor PC
Humidor V
I.C.E. Unit
i64XBOX
i-EPIA
iGrill
ITX Helmet
ITX TV
ITX-Laptop
Jeannie
Jukebox ITX
KiSA 444
K'nex ITX
Leela PC
Lego 0933 PC
Legobox
Log Cabin PC
Lunchbox PC
Mac-ITX
Manga Doll
Mantle Radio
Mediabox
Mega-ITX
Micro TV
Mini Falcon
Mini Mesh Box
Mini-Cluster
Mobile-BlackBox
Moo Cow Moo
Mr OMNI
NAS4Free
NESPC
OpenELEC
Osh Kosh
Pet ITX
Pictureframe PC
Playstation 2 PC
Playstation PC
Project NFF
PSU PC
Quiet Cubid
R2D2PC
Racing The Light
RadioSphere
Restomod TV
Robotica 2003
Rundfunker
SaturnPC
S-CUBE
SEGA-ITX
SpaceCase
SpacePanel
Spartan Bluebird
Spider Case
Supra-Server
Teddybear
Telefunken 2003
TERA-ITX
The Clock
ToAsTOr
Tortoise Beetle
Tux Server
Underwood No.5
Waffle Iron PC
Windows XP Box
Wraith SE/30
XBMC-ION