
Posted on March 8, 2003
Introduction
My whole plan was to put a PC inside of some type of super small case and use it to play ROMs on a TV. Who wants to sit infront of a PC and play old Nintendo games though? That's what I thought. That's where the idea for the box came up.
I wasn't sure what to put the box in. Someone has already put a PC inside a Nintendo, but I didn't want to be a copy cat. I managed to score an XBOX that was gutted on eBay for about $20, so I decided to use that as my starting point. I also got my hands on one of VIA's tiny EPIA motherboards, and a very small ATX/ITX compatible power supply. For the hard drive, I had to keep it small to keep the whole project inside the case. I didn't want anything outside of the XBOX shell... the whole idea of this project was to keep everything self-contained and very modular say I wanted to take it to someone else's house. The only choice for a hard drive was simple - laptop hard drive. My friend Chris York had a 3.2GB laptop drive that he sold me pretty cheap. It had more than enough space than what I was going to use it for, so it was perfect. I was then able to buy a laptop hard drive converter on eBay that would allow me to use it on a normal PC motherboard. It works pretty well.
I was able to get the motherboard to fit in the box after modding it a little and custom mounting my own mounting posts for it to screw into. I had to cut all of the mounting studs from the "floor" of the XBOX and use motherboard standoffs that I had left over from a full-tower ATX case by drilling small holes and forcefully threading them into the plastic XBOX chassis. I cut the back of the XBOX out so the ports on the back would be visible, just like a PC, and use the little port panel that came with the motherboard to keep it clean. I cut almost everything out with some small wire cutters, and then smoothed it all out with a Dremel later. I also was able to keep the plug for the power supply in the same outlet on the back of the case, although I had to open it up a bit with the Dremel.
I put Windows 98 on it and made a custom interface that any USB joystick/gamepad can control. All you do is plug it into the wall, plug in a gamepad or two, and hook it up to the TV via composite video or S-Video (looks much better) and the audio cables I fabbed up and you're ready to go. No keyboard or mouse, and with the exception of the two second text-flash on startup to boot to a LAN (which I can't turn off, sadly) you wouldn't even really be able to tell it was a PC.

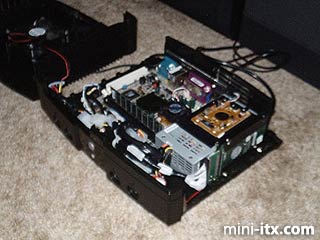
This is how I had the internals set up at first. It looked really clean, but soon would need to be changed.
I was able to get the power button and the LED on the front of the XBOX to work with the PC motherboard thanks to some help from my friend/boss, Chris. The LEDs aren't quite as bright as when an XBOX is powering them, because there are actually two LEDs in there that light up what looks like one light, and there's only one light header on the motherboard for power, so I had to split power between the two LEDs. It's still bright enough though.
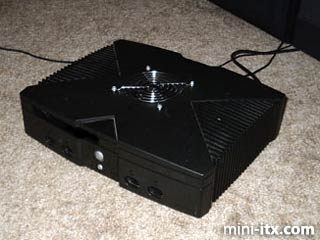
This is what the box looked like at this point. I had all of the hardware inside, had the front buttons and LEDs working like normal, had the hole cut for the fan, and had the grill mounted. The only thing that had to be changed was on the inside. The hard drive had to be moved from ontop of the power supply to the side of it to accomodate the depth of the fan. My original idea was to use an 80mm fan for the top, but I couldn't find an 80mm fan grill, so I used a 92mm fan/grill instead. The fan hit on the top of the hard drive, which wouldn't let the top of the case sit flush with the bottom, so I had to relocate the hard drive. When I did this, I rounded the IDE cable, and performed some clean-up on the inside.
Rockin the stock look. Except that fan grill that's now on the top. I think I might pull that off and paint it black. Or grey. I'm using a Microsoft Sidewinder controller for now. Since it's running Windows 98 it can use pretty much any PC controller. I eventually want to get a pair of wireless controllers for it. I think that'd be pretty sweet.
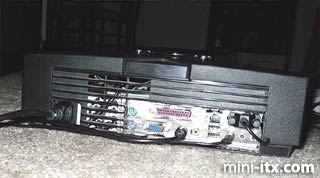
Here's what the ports look like on the back.
Notice the power cord is in the stock location... and the clea, work around the ports for the motherboard. Also notice that if you look through the stock fan grill you can see the fan for the tiny power supply. This lets the PSU exhaust stay functional, but maintains a very stock look. Needless to say, PSU mounting worked out pretty well.
 |
 |
 |
Quick Links
Mailing Lists:
Mini-ITX Store
Projects:
Show Random
Accordion-ITX
Aircraft Carrier
Ambulator 1
AMD Case
Ammo Box
Ammo Tux
AmmoLAN
amPC
Animal SNES
Atari 800 ITX
Attache Server
Aunt Hagar's Mini-ITX
Bantam PC
BBC ITX B
Bender PC
Biscuit Tin PC
Blue Plate
BlueBox
BMW PC
Borg Appliance
Briefcase PC
Bubbacomp
C1541 Disk Drive
C64 @ 933MHz
CardboardCube
CAUV 2008
CBM ITX-64
Coelacanth-PC
Cool Cube
Deco Box
Devilcat
DOS Head Unit
Dreamcast PC
E.T.PC
Eden VAX
EdenStation IPX
Encyclomedia
Falcon-ITX
Florian
Frame
FS-RouterSwitch
G4 Cube PC
GasCan PC
Gingerbread
Gramaphone-ITX-HD
GTA-PC
Guitar PC
Guitar Workstation
Gumball PC
Hirschmann
HTPC
HTPC2
Humidor 64
Humidor CL
Humidor II
Humidor M
Humidor PC
Humidor V
I.C.E. Unit
i64XBOX
i-EPIA
iGrill
ITX Helmet
ITX TV
ITX-Laptop
Jeannie
Jukebox ITX
KiSA 444
K'nex ITX
Leela PC
Lego 0933 PC
Legobox
Log Cabin PC
Lunchbox PC
Mac-ITX
Manga Doll
Mantle Radio
Mediabox
Mega-ITX
Micro TV
Mini Falcon
Mini Mesh Box
Mini-Cluster
Mobile-BlackBox
Moo Cow Moo
Mr OMNI
NAS4Free
NESPC
OpenELEC
Osh Kosh
Pet ITX
Pictureframe PC
Playstation 2 PC
Playstation PC
Project NFF
PSU PC
Quiet Cubid
R2D2PC
Racing The Light
RadioSphere
Restomod TV
Robotica 2003
Rundfunker
SaturnPC
S-CUBE
SEGA-ITX
SpaceCase
SpacePanel
Spartan Bluebird
Spider Case
Supra-Server
Teddybear
Telefunken 2003
TERA-ITX
The Clock
ToAsTOr
Tortoise Beetle
Tux Server
Underwood No.5
Waffle Iron PC
Windows XP Box
Wraith SE/30
XBMC-ION